Blog
Occasional posts on subjects including field recording, London history and literature, other websites worth looking at, articles in the press, and news of sound-related events.
20 January 2012
Building a field recording system 2: the compact recorder
THE COMPACT DIGITAL recorder is a device small enough to stuff into a trouser or jacket pocket. It’s a minor miracle of convenience and versatility compared to bulkier analogue ancestors like the Sony Professional Walkman. Prices have fallen as more manufacturers have entered the contest and current makes include Marantz, Tascam, Roland, Sony, Olympus, Korg and Zoom.
All these recorders are self-contained devices with built-in microphones for recording in stereo. Even basic models can produce uncompressed WAV files at high sample rates, as well as MP3 files. They’ll store the recordings either in a fixed internal memory, or onto removeable SD cards, or both. They’ll also have a USB port so you can easily transfer the recordings to your computer.
The Zoom H1 is the cheapest at around £80. The most expensive is the exotic Korg MR-2 at £550 and I don’t know anyone who’s got one. Both the Zoom H1 and the Korg are outliers which aren’t worth considering. This leaves a range beginning with the Tascam DR-07 at around £120 and extending to the Olympus LS-11 and the Sony PCM M10, both at around £230.
Because the price gap across that range of devices is only just above £100, it really is worth getting either the Sony PCM M10 or the Olympus LS-11. They have better build quality and make cleaner-sounding recordings because they have higher-quality components. You get what you pay for.
Some online comparisons pit the Olympus LS-11 against the Sony PCM M10. By far the best is on Robin Parmar’s Theatre of Noise website. The Sony machine may be a tiny bit better than the Olympus for the field recording system we’re going to build up, so that’s the one that’s going to be looked at here.
CLOSE-UP ON THE SONY PCM M10
As you’d expect from Sony, the build quality is good. The front of the M10 is mostly made of aluminium. The sides and back are plastic. The machine fits quite well into the hand and if you squeeze it you don’t hear nearly so many of the little creaking noises that you get with cheaper recorders.
All the M10’s buttons on the front require a fair amount of pressure to work them, thus reducing the chances of accidentally stopping or starting a recording. The familiar transport buttons of record, play and pause light up from behind to help show what’s going on. The menu system is easy to use, although there are a couple of functions which could do with being brought forward rather than listed inside the ‘detail menu’ option.
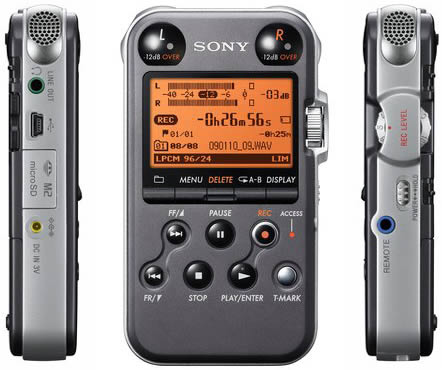
The M10 comes with a generous 4-gigabyte internal memory and that’s enough to capture around 3 hours 40 minutes of audio at a decent archival quality setting of 24bit/48kHz. Battery life is superb and you may start to wonder whether the two AAs you put in at the start will ever exhaust themselves. It’s also got a screw fitting on the back so you can mount it on a camera tripod.
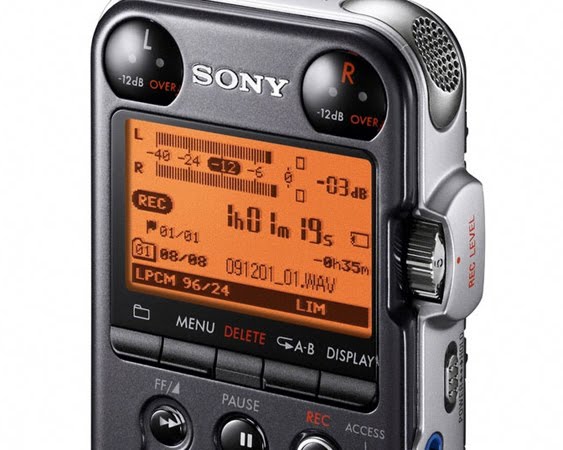
AN EYE ON THE LEVELS
Like all compact recorders, the Sony’s backlit display tells you how much time has elapsed, the current filename, the recording mode selected, as well as giving a rough idea of how much battery life is left. One of the more significant parts of the display is the levels meter marked in decibels.
Anyone new to sound recording might reasonably be baffled by the decibel or ‘dB’ markings on the levels meter. If the loudness of normal conversation is reckoned to be around 65dB when heard from a few feet away while virtual silence is 0dB, how can there be such a level as minus 6 or minus 12dB? Why doesn’t the levels meter begin at 0dB and go up to, say, 120dB?
The simplest answer is that although it’s using decibels, the meter’s telling you about audio signal levels inside the machine, which you control, rather than the actual sound pressure levels in the air, which you don’t unless you’re recording yourself singing in the bath.
Decibels are unlike the measurement units we’re most familiar with, such as inches or litres. Each increase of 10dB over some lower value means a ten times increase in the power or intensity of the sound: 20dB is ten times more powerful than 10dB, and 30dB is a hundred times more powerful than 10dB. This is a good way of condensing into manageable units the huge range of differences in sound pressure levels detected by our sense of hearing.
Decibels can also express the differences in the strength of audio signals in an amplifier or other electronic circuit. In the case of the M10’s levels meter, 0db signifies maximum power or gain, and as they grow larger the minus decibel values represent an ever-greater attenuation of gain. Minus 3dB is 50% of maximum gain, minus 6dB is 25%, minus 12dB is 6% and minus 24dB is just 0.4%.
It’s important to get the levels right while recording. The M10 has two coloured lights by each microphone which can help. A green light comes on when the level on that particular channel, left or right, reaches minus 12dB. That’s a desirable level for at least some situations or subjects. A red light comes on when the gain for that channel has reached maximum: time to move away or turn the recording level wheel down a notch or two.
Over time you’ll develop an intuitive feel for how to set your levels depending on where you are and what you’re recording. Don’t ever rely on the M10’s automatic gain control, or indeed that of any other recorder. The results often sound artificial and unattractive. It’s much better to learn about levels through practice.
BUT HOW DOES IT SOUND?
Many reviews of the M10 have praised how quiet or clean its mics sound, meaning they don’t have as much of the hiss and sound colouration that’s noticeable with really cheap kit. Two little mics built into a £230 recorder aren’t going to sound as good as a £450 stereo mic like the Audio Technica BP4025 or a couple of DPA 2006C mics at £1,200 a pair. But they’re not bad and, as stated in the first post in the series, the best recording equipment is always what you’ve got on you at the time.
Here’s a couple of admittedly lazy, opportunistic tests edited together. The first part was made in a lift at work and the second at St Pancras station while waiting for the train home:
The lift recording isn’t particularly useful although there’s no apparent hiss in what was a fairly quiet environment, and the sound of someone jingling keys close by is reasonably well localised. The train station recording is lacking in drama and oomph – in reality people on the platforms at St Pancras often wince at the sharp squealing sounds of the wheels. It’s also hard to work out from the recording in what directions the trains were moving. The M10’s mics produced a poor stereo image in those surroundings.
The Wingfield Audio website has a very useful page of recording samples made with a range of recorders. The M10’s internal mics do well with the isolated, clearly-defined sound sources of a cello and someone talking.
GOING FOR GROWTH: MIC AND LINE INPUTS
One of the goals of the field recording system is to work towards bypassing the recorder’s internal mics and preamplifier in favour of higher-quality external devices made for doing those particular jobs and nothing else. The recorder will then be used for its handy display, analogue-to-digital converter, and file storage only.
On the top of the M10 are the mic and line sockets which will make this possible. It’s a convenient enough place to put them, too.

The bottom of the M10 has a tiny loudspeaker which isn’t useful for much, except perhaps to reassure you that you have actually managed to record something other than silence.
The mic socket is the one on the left in the picture and it has two functions. First, it’s designed to deal with audio signals of mic level strength coming straight from an external microphone and hence relatively weak. The M10’s preamplifier, the same one used to increase the gain of its internal mics, will also increase the gain of a signal reaching it through the mic socket to line level.
The mic socket’s second purpose is to provide plug-in power for any external microphone which needs it. Plug-in power is a low-current supply of around 4 volts and it’s used to drive small microphones called electret condensers or just electrets for short. They’re commonly used as pairs for binaural recording, which we’ll examine in a later post. (The leads from a binaural pair will converge at a single 3.5 mm (1/8”) jack, so you don’t need two mic sockets.)
The line-in socket is a much simpler affair. It can’t provide plug-in power and it’s designed for audio signals which have already been raised by an external preamplifier to line level. A signal reaching the line-in socket therefore bypasses the M10’s preamp because it’s assumed that it doesn’t need to have its gain increased by a large amount.
Yet if you turn the recording level wheel while the M10 is recording an audio source connected to its line-in socket, the levels meter will show the gain increasing or decreasing accordingly. If the M10’s preamp has supposedly been bypassed, what’s causing this to happen? It may be that a different circuit is involved, and if so it’ll be simpler than the preamp because it isn’t designed to increase the gain nearly as much.
This post has touched on technical concepts such as decibels, gain, line level and mic level. It’s useful to have some idea at the outset of what they mean. Next up is a look at the most basic and essential accessories you’ll need to get the best out of your compact recorder.
All posts
Old London Cries, 1847 – July 2020
Early street cries from London and Rome – June 2020
Street Cries: Hawkers & Walkers of Early America – June 2020
Sony PCM D100 recorder review – May 2020
Chant – May 2020
Coronavirus – March 2020
Street Cries: London Lickpenny – February 2020
Successor – February 2020
More January street cries – January 2020
Tidal Thames: Procter & Gamble, Thurrock – January 2020
Street Cries: January 2020 addition – January 2020
Sounds of the London Loop – December 2019
LMA talk: thank you – November 2019
Recordings: November 2019 additions – November 2019
November talk – November 2019
Street Cries: October 2019 additions – October 2019
New guestbook – October 2019
Rutting season – October 2019
The clattering bridge – October 2019
London Metropolitan Archives – March 2019
Street cries now being added to Pinterest – January 2019
Social media – January 2019
Recent site upgrades – December 2018
Hiatus – August 2018
BBC sound effects plotted on a map – July 2018
In memory of Richard Beard, wildlife recordist – June 2018
New section on historical street cries – April 2018
Long in the tooth – June 2017
Acoustic baffle – January 2017
MixPre-D clamp – November 2016
New York Times – August 2016
The EU referendum and the silence of the streets – June 2016
Media chancers – April 2016
New feature: Sounds of the Musical Museum – February 2016
The soundscape of Oxford Street – December 2015
Tim Hunkin – November 2015
The reverberant city – November 2015
New! Old! More historical recordings added – November 2015
Sounds of 1960s Las Vegas – November 2015
Five fundamental stances in recording – October 2015
The trouble with sound maps – May 2015
The average of the average – March 2015
The sounds of sectarianism – March 2015
Which sex does a computer sound like? – February 2015
Why girls shouldn't run away to London – February 2015
Arthur Machen: the sounds from beyond the veil – February 2015
Vanished City: London's Lost Neighbourhoods by Tom Bolton – January 2015
Sound and Music's Creative Data Club – January 2015
Out of town: Whittlesey Straw Bear festival – January 2015
The Bird Tree – December 2014
Down with noise: first impressions of Sennheiser MKH 8020 mics – December 2014
The Block: making a simple stereo baffle – December 2014
Thanks to everyone at the Marlborough and the Social – December 2014
The London Sound Survey as a full-time concern – August 2014
Thanks to everyone who came to Earshots 4 – June 2014
Edgelands: Staines Moor – June 2014
Guest post from Cities and Memory – May 2014
Darwin among the earthworms – May 2014
Up with the lark: soundCamp in Rotherhithe, May 3–4 – April 2014
Coming this April: Field Studies 2014 – March 2014
Hello and welcome to Mail Online readers – January 2014
Sensing Cities back on Resonance 104.4 FM from this Friday – January 2014
Sounds in poetry: 'Adlestrop' and 'Death of a Naturalist' – January 2014
Sound and the Law: Sounds you must and must not make – November 2013
Sound and the Law: What are the limits on recording? – October 2013
Permanent present – September 2013
Ships' Opera at the Thames Festival – September 2013
Quiet please #2: Peabody estate, Victoria – September 2013
Extra! Recordings of English newspaper sellers – August 2013
Quiet please #1: Lincoln's Inn – August 2013
All systems go – July 2013
London Sound Survey LP progress report – June 2013
What does London really sound like? – May 2013
These Are The Good Times album cover – May 2013
When sounds don't play on Safari – April 2013
Street noise and the taming of Victorian London – April 2013
Here soon: the London Sound Survey vinyl LP – March 2013
Crossing the Thames at Woolwich – March 2013
Sounds of disaster in peacetime London – February 2013
Reverberation and Authority – January 2013
London on Christmas Eve – December 2012
Beware the Cat: auditory overload in the 16th century – November 2012
Jez riley French in Soho – November 2012
Coming up! Second batch of vintage BBC radio sounds – November 2012
The resurgence of religion in London – November 2012
Searching for unearthly sounds – October 2012
Sound, hallucination and the moment of epiphany – September 2012
London voices: outline of a new sound map – September 2012
One-track mind – August 2012
Yeah, yeah, industrial estate – August 2012
Rudyard Kipling and sonic warfare – August 2012
Field recording and Philip Larkin on poetry – July 2012
The man who heard the flowers scream – July 2012
Motorcycle Wall of Death – July 2012
Casanova in London – June 2012
Third annual report – June 2012
Hello to Wire magazine readers – June 2012
A quick thank-you to Sound Network – May 2012
Mapping London's subterranean rivers – May 2012
Time off in the Scottish Highlands – April 2012
Absence of sound – April 2012
A taxonomy for field recordings – March 2012
Victorian cage-bird fanciers of Brick Lane – March 2012
The slow movement – February 2012
Thoughts on classifying field recordings – February 2012
Building a field recording system 3: recorder accessories – January 2012
Building a field recording system 2: the compact recorder – January 2012
Building a field recording system 1: introduction – January 2012
Where Londoners come from – January 2012
Nice to meet you, London Historians – January 2012
Thanks, Londonist – December 2011
James Greenwood's 'The Wilds of London' from 1874 – December 2011
Our synthetic sound environment – December 2011
Making engine noises with a jam jar – December 2011
Spam attack! – December 2011
Five compact XLR-enabled audio recorders – November 2011
Some recordings from the Waterways sound map – November 2011
Victoria coach station in 1935 and 2011 – November 2011
London sounds from 1930s and 1940s BBC radio – October 2011
Your recordings from Embankment and Dalston – October 2011
When the planes stopped flying – September 2011
Sound and health – September 2011
New recordings in from Sam Appleby and Craig Barrett – September 2011
Making soundmaps with iframes and image maps – September 2011
Sound-mapping London's waterways – August 2011
Looting the Iceland store in Rye Lane, Peckham – August 2011
East London Line recorded by John Bingham Hall – August 2011
Wind-powered sound art in Cumbria – July 2011
Sonic pleasures of the landline telephone – June 2011
Les Passages Couverts – English Style – June 2011
Shopaholic – June 2011
Sounds of the Thames estuary remembered – June 2011
The London Sound Survey at SoundFjord, 12th June – June 2011
Two years old today – May 2011
What do tornadoes sound like? – May 2011
Beddington Farm – May 2011
Seeing sounds: Izotope RX2 as a wave editor – May 2011
Regina Burbach: stories told through sound – May 2011
Today is International Dawn Chorus Day – May 2011
Allhallows Marshes – April 2011
First round is the theme round – April 2011
Sounds of protest from 12 Gates to the City – April 2011
Adrian Stokes: an aesthete in Hyde Park – March 2011
Thames drifter – March 2011
Howling wolf – March 2011
Cuckold's Haven – March 2011
Willesden Junction at dawn – February 2011
Mug-house riots and a short history of hissing – February 2011
Sights and sounds of London street markets – February 2011
Historical maps now online – February 2011
Make the darkness your friend – January 2011
New uses for old London maps – January 2011
Real sounds of Lagos – January 2011
Sound maps from Inukjuak and New York State – January 2011
The All-in-One London Map is now online – January 2011
Across the miles – December 2010
London through a glass – December 2010
Three recordings from Greenwich and its peninsula – December 2010
Two quick recordings from Camden Town – December 2010
What are the earliest sounds you can remember? – December 2010
Lonely Planet and the London Sound Survey – December 2010
Sound and history: new site section preview – December 2010
The Audio Technica BP4025: your reliable stereo workhorse – November 2010
Recordists on film: The Stone Tape and The Shout – November 2010
New site section on the way – November 2010
Recordists on film: Lisbon Story and Gadjo Dilo – November 2010
T?n? koutou katoa, New Zealand sound lovers – November 2010
Paris street music – October 2010
The sound collectors – October 2010
Guest post from Nick Hamilton of Lost Steps – October 2010
Film sound clichés – October 2010
Lost Steps back on Resonance 104.4 FM! – October 2010
Hello and welcome to our Chinese listeners – October 2010
West to Arcadia – September 2010
Thames lightermen and an origin for whistling – September 2010
Adventures in ultrasound: recording with the London Bat Group – September 2010
Coming up: the LSS at Sound:Site and on BBC World Service – September 2010
Chasseur du Son – August 2010
Thomas Burke, a man in love with London – August 2010
Mad about the buoy – August 2010
Entente cordiale: Des Coulam's guest post from Paris – August 2010
A useful fantasy – August 2010
Sounds unreal – July 2010
Jack London among the Cockneys – July 2010
Rebranding exercise – July 2010
Doing anything on World Listening Day? – July 2010
New Thames estuary section now added – July 2010
Two recordings from Canvey Island – June 2010
The walk won't do you good – June 2010
New binaural mics from Roland – May 2010
The London Nobody Sings – May 2010
Out and about on May Day – May 2010
Nocturnal emitters – May 2010
The sounds and history of Caledonian Road – April 2010
Two south London dawn choruses – April 2010
Volcano makes London plane-free – April 2010
Quiet please – April 2010
Bill Fontana at Somerset House from 15 April – April 2010
The sound grid is done – April 2010
The solar system music box – March 2010
History's history – March 2010
Finch sound art at the Barbican – March 2010
George Gissing and the Nether World – March 2010
On the Hoo Peninsula – March 2010
Car wash in three acts – March 2010
At the banger races – March 2010
Sound and sociability – February 2010
Head-worn mics for under £300 – February 2010
From Kew Gardens to Battersea Bridge – February 2010
Rituals of public shaming – February 2010
Notting Hill Carnival 1984 – January 2010
Binaural sounds from Russia – January 2010
Night-walking and the poet of Villiers Street – January 2010
Sound is Art – January 2010
???????????? ? ????? ?????????? ? ???, ??????? ????????? – January 2010
Crowds and crime in Defoe's Moll Flanders – January 2010
Weird Vibrations and the politics of sound – January 2010
Two sunny afternoons in south London – January 2010
Wishing you all a happy 2010 – December 2009
Toothache hotel – December 2009
Modern voices of authority – December 2009
A new website feature – December 2009
Please keep your belongings with you at all times – December 2009
Bleak House and Babbage's library of sound – December 2009
Some field recording tips – December 2009
Out and about – December 2009
London Sound Survey on Lost Steps/Resonance FM – December 2009
VE Day celebrations and a tram's final journey to New Cross – December 2009
Some auditory curiosities – November 2009
Two great sound references from 'History is Made at Night' – November 2009
Golden days of the rag-and-bone men – November 2009
Jive at the Paramount Ballroom, 1947 – November 2009
Doodlebugs – November 2009
Past sounds of Lambeth Walk and London Bridge station – November 2009
Sounds of the Chislehurst underworld – November 2009
Kenneth Williams and the Mayor of Garratt – October 2009
When smashing windows is a sound action – October 2009
Catford night life – October 2009
Gone to budgery – October 2009
Birds and police whistles – September 2009
Weird for sound – September 2009
How Islington sounded in the 1950s – September 2009
Noisy streets of London – September 2009
Doves from above – September 2009
London Sound Survey on Radio 4 – September 2009
New wildlife section – August 2009
The Elephant and the Submarine – August 2009
These are the warning sounds – August 2009
Gypsy buskers on the Underground – August 2009
The train beggar – August 2009
1892: Grisly sounds in a London church – July 2009
From the Crystal Palace to Bluewater – July 2009
The decline of whistling – July 2009
Fairground barkers – July 2009
A few words at the beginning – May 2009
Links
ABOUT SOUND
FIELD RECORDINGS
The balloonist in the desert is dreaming
The Binaural Diaries of Ollie Hall
GEOGRAPHY AND WANDERINGS
The Ragged Society of Antiquarian Ramblers
LONDON
ORGANISATIONS
Midwest Society for Acoustic Ecology
World Forum for Acoustic Ecology